

This article is about to host multiple websites in single google cloud hosting. That means this article is helpful to you if you have already created a WordPress website on that hosting and wants to create one another website of other domain.
WHY GOOGLE CLOUD HOSTING?
I suggest the google cloud hosting to create a website because I am using this hosting and I have only one google cloud account on which I created 4-5 WordPress website. My all websites are in running condition and the loading speed of those websites are too good. And also if you are a new user on google cloud platform then google provide you the 1-year free subscription, that means you can use google cloud hosting for 1 year without paying any cost, and after 1 year you will have to pay some charges monthly. The charge will depend on the number of websites, and also it depends on the size of your website which was you selected at the time of installation of WordPress.
STEPS FOR CREATING MULTIPLE WEBSITES
Step1-First of all login to your google cloud account and click on the Navigation menu button which is at the left upper corner and then go to the Compute Engine and click on VM instances
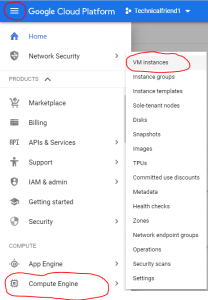
Step2-SAfter opening the VM instances simply click on the instance which was you created at the time of the creation of your previous website
![]()
after opening the instance click on the CREATE SIMILAR.
Step3-Now in the Name section replace the name by your new domain name and then scroll down and in the Access scopes select Allow default access, then click on Create button, then the new instance will create for your new domain

Step4-Now again open the Navigation menu and go to the Network services and click on Cloud DNS, in the cloud DNS you have to create a new zone so click on create zone button, now you have to fill the zone details so in zone name fill your domain name without using an extension. For example, if your domain name is example.com then simply fill example in the zone name and in the DNS name section fill your domain name by using the extension then click on create button.

Step5-After creating the zone you have to add a record set, so simply click on the ADD RECORD SET and after that, a new page will open. On that page, you have to fill only the IPv4 address. Now in the IPv4 address section, you have to fill the external IP of your website, so for getting external IP address open the VM instances again in a new tab and copy your instance External IP and paste it into the IPv4 address section and then click on create button

Step6-Now you have to create one another record set so again click on ADD RECORD SET and fill the form as follow, at the DNS name section type www and change the Resource record type to CNAME and in Canonical name fill your domain name by using extension then click on create button.

Step7-Everything is done you have created the zone for your website and in that zone, there are four name servers available, the last and final step is to copy those name servers and paste it to your domain nameservers and copy those name servers by skipping the ( . ) which is in the last of nameservers

Now open the account on which you buy your domain, for example, I buy the domain from GoDaddy so I will open my GoDaddy account in new tab after login to your account open the DNS manager there are two nameservers already available so click on change button and erase those nameservers and paste those four nameservers which you are copied from your google cloud platform and then click on save button. This process will takes some time, after 10-20 minutes or a maximum of 24 hours, your domain will be linked with your website and you can easily access your website.
How To Remove Bitnami Banner From WordPress On Google Cloud